Jan 082015
 

By default, nothing happens when you try to send a file to your Ubuntu machine via Bluetooth. Pairing doesn’t help. I found the solution at Tech Areena:

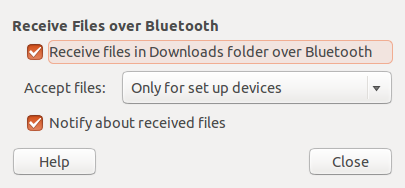
1) Launch the Personal File Sharing settings, which can by found via a search in the Unity Dash.

Personal File Sharing

2) Enable receipt of files via Bluetooth.

Receive Files Over Bluetooth

Jan 102014
 

There are quite a few posts out there on how to make multi-hop SSH easier. Often this is called SSH’ing via jump box or proxy host.

Most of them work via netcat (nc), which is a bit finicky. A better, less mentioned, option is the SSH’s -W flag. Implemented in your ~/.ssh/config, it looks like this:

Host my_server
  IdentityFile server_key.pem
  HostName 172.31.4.82
  User username
  ProxyCommand ssh -i key_for_jumpbox.pem -W %h:%p jumpbox_user@jump.box.host

Now just ssh my_server and you’re off to the races! For a quick-n-dirty one-liner without editing your SSH config, it looks like this:

ssh -i server_key.pem -o "ProxyCommand ssh -W %h:%p -i key_for_jumpbox.pem jumpbox_user@jump.box.host" username@172.31.4.82

A very clever solution described on the Gentoo Wiki enables a simple syntax: ssh host1+host2. But it gets uglier with differing usernames: ssh user1%host1+host2 -l user2. Also it uses netcat rather than -W and doesn’t appear to play nicely with needing to specify key files with -i. A little monkeying could solve those problems. A project for a future day.

On a another note, I find it useful to alias ssh_unsafe and scp_unsafe as follows:

alias ssh_unsafe="ssh -o UserKnownHostsFile=/dev/null -o StrictHostKeyChecking=no"
alias scp_unsafe="scp -o UserKnownHostsFile=/dev/null -o StrictHostKeyChecking=no"

Handy when connecting to a box for which you do not care to remember or verify the host key.

Oct 152013
 

UPDATE 2013-10-16: Macports now has a mysql_select package that cleanly solves this problem. Run the following and then pip will be able to find mysql_config without issue.

sudo port install mysql_select
sudo port select mysql mysql56

Using pip to install MySQL-python (aka MySQLdb) gives the error “EnvironmentError: mysql_config not found” when run on a system where MySQL has been installed via MacPorts. The solution is to tell the installer where mysql_config can be found by appending “mysql_config = /opt/local/bin/mysql_config5” to site.cfg. Assuming use of virtualenvwrapper (highly recommended!):

pip install --no-install MySQL-python
... ignore errors ...
VENV=$(dirname $(dirname $(which python))); echo "mysql_config = /opt/local/bin/mysql_config5" >> $VENV/build/MySQL-python/site.cfg
pip install --no-download MySQL-python
Oct 152013
 

Virtualenvwrapper is a great way to manager Python environments. This is a quick cheatsheet for using it.

Setup

Get Python

On OS X:
<install MacPorts>

sudo port install python27
sudo port select python python27

Install standard packages

 sudo easy_install pip
sudo pip install virtualenv
sudo pip install virtualenvwrapper
sudo pip install yolk

Configure virtualenvwrapper

In your .zshrc, .bashrc, etc, add:

source $(dirname $(which python))/virtualenvwrapper.sh

In your .zshenv, .bashrc, etc., add:

export WORKON_HOME=~/.virtualenvs

Create .virtualenvs directory:

 mkdir $WORKON_HOME

List available environments

workon

Make an environment

Note: environments are stored in your ~/$WORKON directory and you can issue these commands from anywhere.

mkvirtualenv myproject

Select an environment

workon myproject

Within an environment, pip install packages as usual.

See the Virtualenvwrapper docs for more information.

Aug 092013
 

The GNU version of find has some nice features (like -readable). You can install it with MacPorts using sudo port install findutils. However, this installs it as gfind. There are some references on the web to using the +with_default_names variant to avoid this, but a quick check of port variants findutils reveals that there is no such variant. This is intentional. The new approach is that /opt/local/libexec/gnubin/ contains symlinks with the native names. So add this directory to your path as well and you’re all set.

For more GNU goodness, check out the md5sha1sum package (for md5sum) as well as coreutils.

Jul 032013
 

I had trouble finding a good recipe for Apache SSL configuration that achieves perfect forward secrecy while avoiding other pitfalls such as the BEAST attack, so I made my own.

First, SSLv2 is vulnerable, so disable it. On my Ubuntu box this was already done in ssl.conf:

# enable only secure protocols: SSLv3 and TLSv1, but not SSLv2
SSLProtocol all -SSLv2

TLSv1 is widely supported, so it makes sense to include -SSLv3 as well.

Second, tell the browser to pay attention to the order ciphers are specified in:

SSLHonorCipherOrder On

Next, compose the cipher list. The BEAST attack against how SSLv3 and TLSv1.0 do cipher block chaining makes most of the otherwise good ciphers (e.g. AES) vulnerable, leaving only the weaker RC4 as a viable option for those protocols. That is easier said than done, since Apache doesn’t allow conditional cipher list control based on protocol, and one can’t simply disable those protocols because browser support for TLS v1.1 and higher is still weak. As a proxy for checking the protocol version I therefore I resort to preferring ciphers that were only introduced after TLSv1.0. TLSv1.1 didn’t introduce anything new, but TLSv1.2 added new hashing algorithms (AEAD, SHA384, SHA256; prior to that, AES was only available with SHA1 hashing). Thus the first organizational principal of the list is: TLSv1.2 and above, followed by RC4, followed by older protocols.

Perfect forward secrecy is achieved by using ephemeral Diffie-Hellman (EDH). Ephemeral elliptic-curve Diffie-Hellman (EECDH) is reasonably fast, so I prefer it. Otherwise EDH is slow; consider omitting if you’re serving a lot of traffic on limited hardware. Thus the second organizational principal is: use each cipher only in combination with EECDH or plain EDH. (But prefer to relinquish perfect forward secrecy before being vulnerable to BEAST.)

Finally, for good hygiene, explicitly disable anything using no authentication (!aNULL), no or weak encryption (!eNULL, !EXP, !LOW), or weak hashing (!MD5)

The recipe thus is:

SSLCipherSuite EECDH+AES:EDH+AES:-SHA1:EECDH+RC4:EDH+RC4:RC4-SHA:EECDH+AES256:EDH+AES256:AES256-SHA:!aNULL:!eNULL:!EXP:!LOW:!MD5

The syntax for the recipe is the same as for the openssl ciphers command. Of note, the leading “-” in -SHA1 means remove any ciphers with SHA1 hashing that had been previously added, whereas RC4-SHA is just the name of a particular cipher.

Unfortunately, older versions of Apache might not include all of these. E.g. Apache 2.2 on Ubuntu 12.04 LTS lacks EECDH (and there is no EDH RC4 variant). Thus in practice most browsers would use RC4 without perfect forward secrecy (but at least no BEAST vulnerability). The solution is to get a newer version of Apache, either by waiting for Ubuntu 13.10 obtaining it elsewhere. Configuration can be tested easily via SSLLabs.

Update 2013-11-09:

I’ve found a few alternate recommendations around the web. They put less emphasis on BEAST protection (perhaps wise; BEAST is mostly mitigated client-side now) and more emphasis on perfect forward secrecy. To varying degrees they also have stronger preferences for GCM and greater reluctance to accept RC4.

Of particular note are, I think, the following recommendations:

Personally, I’m going to go with Mozilla OpSec’s. Their reasoning is well explained on their page. Of note, they prefer AES128 over AES256. In their words: “[AES128] provides good security, is really fast, and seems to be more resistant to timing attacks.

Noteworthy in Ivan Ristic’s and Geoffroy Gramaize’s recommendation is that SSLv3 is disabled. I think this mostly just breaks IE6, though some security related differences between SSLv3 and TLS v1.0 are mentioned on Wikipedia.

Also before I didn’t talk about CRIME and BREACH. To protect against CRIME, disable SSL compression. This is included in the examples linked. To protected against BREACH, you need to disable compression at the HTTP level. For Apache 2.4, just do this once globally:

<Location />
  SetEnvIfExpr "%{HTTPS} == 'on'" no-gzip
</Location>

For older versions of Apache, place this in each VirtualHost where SSLEngine is on:

<Location />
    SetEnv no-gzip
</Location>
Jun 282013
 

Here is how to customize how Jackson serializes Joda-Time dates to JSON:

objectMapperFactory.registerModule(new SimpleModule() {
    {
        addSerializer(DateTime.class, new StdSerializer<DateTime>(DateTime.class) {
            @Override
            public void serialize(DateTime value, JsonGenerator jgen, SerializerProvider provider) throws IOException, JsonGenerationException {
                 jgen.writeString(ISODateTimeFormat.date().print(value));
            }
        });
    }
});

You can use this in combination with JodaModule, just place it after the JodaModule is registered.

Alternatively, if all you need is to write DateTimes in ISO 8061 format instead of as Unix epochs, you can use the following:

objectMapperFactory.registerModule(new JodaModule())
objectMapperFactory.disable(SerializationFeature.WRITE_DATES_AS_TIMESTAMPS);

JodaModule registers a custom DateTimeSerializer that takes the setting into account. However, unlike the standard Java Date implementation, SerializationFeature.WRITE_DATE_KEYS_AS_TIMESTAMPS and getSerializationConfig().setDateFormat(myDateFormat) are ignored, so there is no way to fine-tune the serialization.

Ultimately a more elegant solution would be to give JodaModule some additional constructors or setters that allow passing in a DateFormatter that its various helper classes would use.

Mar 282013
 

If you use the timestamptz data type, Postgres does timezone conversions automatically.

First, some test data:

pg=> create table time_test (id text, stamp timestamptz);
CREATE TABLE
pg=> insert into time_test values('foo', now());
INSERT 0 1
pg=> insert into time_test values('foo', now());
INSERT 0 1
pg=> select * from time_test;
id | stamp
-----+-------------------------------
foo | 2013-01-22 00:53:40.325041+00
foo | 2013-01-22 00:54:02.021018+00
(2 rows)

Client-supplied data data in other timezones is automatically converted for comparisons:

pg=> select * from time_test where stamp > '2013-01-21 16:54:00 PST';
id | stamp
-----+-------------------------------
foo | 2013-01-22 00:54:02.021018+00
(1 row)

Results can be converted on the fly:

pg=> select id, stamp at time zone 'PST' from time_test;
id | timezone
-----+----------------------------
foo | 2013-01-21 16:53:40.325041
foo | 2013-01-21 16:54:02.021018
(2 rows)

…once, or for the whole session.

pg=> set session time zone "pst8pdt";
SET
pg=> select * from time_test;
id | stamp
-----+-------------------------------
foo | 2013-01-21 16:53:40.325041-08
foo | 2013-01-21 16:54:02.021018-08
(2 rows)

pg=> insert into time_test values ('bar', '2013-01-21 16:55:03');
INSERT 0 1
pg=> select * from time_test;
id | stamp
-----+-------------------------------
foo | 2013-01-21 16:53:40.325041-08
foo | 2013-01-21 16:54:02.021018-08
bar | 2013-01-21 16:55:03-08
(3 rows)


Nov 302012
 

While working on a deployment process that automatically updated an ElasticIP to point to a new instance, I got to see a lot of these:

Offending key in /Users/lhn/.ssh/known_hosts:45
RSA host key for xxx.yyy.zzz has changed and you have requested strict checking.
Host key verification failed.

Here is a sed one-liner to delete offending key (on line 45 in this case) from SSH’s known_hosts file.  This is a reasonable thing to do when you know why the host key has changed and don’t expect it to do so very often.

sed -i -e '45d' ~/.ssh/known_hosts

-i is for in-place editing and -e provides the expression, which is to delete line 45.

However, sometimes you expect the host key to change frequently and a better approach to not check or store the host key in the first place. That can be achieved as follows (kudos Peter Leung)

ssh -o UserKnownHostsFile=/dev/null -o StrictHostKeyChecking=no user@some.host

This tells SSH to use always-empty /dev/null as its place to record host keys and to not complain when connecting to host with an unknown key. Thus no host keys are stored or checked.

At the risk of stating the obvious, this does of course side-step SSH’s ability to protect you from man-in-the-middle attacks.